IoT-Ep5 | HTTP POST gửi dữ liệu lên Thingspeak
Trong bài viết này, chúng ta sẽ đi tìm hiểu cách sử dụng phương thức POST (HTTP POST request) để cập nhật dữ liệu cảm biến trên Thingspeak. Các bạn có thể theo dõi video-demo hoặc bài hướng dẫn dưới đây.
Mục lục
1. Giới thiệu
Các phương thức HTTP requests được sử dụng tuỳ theo những yêu cầu riêng. Nền tảng Thingspeak ngoài hỗ trợ cập nhật dữ liệu bằng phương thức HTTP GET, cũng hỗ trợ phương thức HTTP POST để gửi yêu cầu cập nhật dữ liệu trên Channel. Khi sử dụng phương thức GET, tất cả dữ liệu biểu mẫu được mã hoá thành URL, và được nối vào URL dưới dạng tham số chuỗi truy vấn. Còn khi sử dụng POST, dữ liệu biểu mẫu xuất hiện trong nội dung yêu cầu của HTTP POST request.
Trong bài này, chúng ta sẽ tìm hiểu về phương thức POST mà Thingspeak hỗ trợ để cập nhật dữ liệu và xem cách lập trình trên NodeMCU để gửi các yêu cầu POST đính kèm dữ liệu nhiệt độ và độ ẩm từ cảm biển DHT22.
2. Phương thức POST
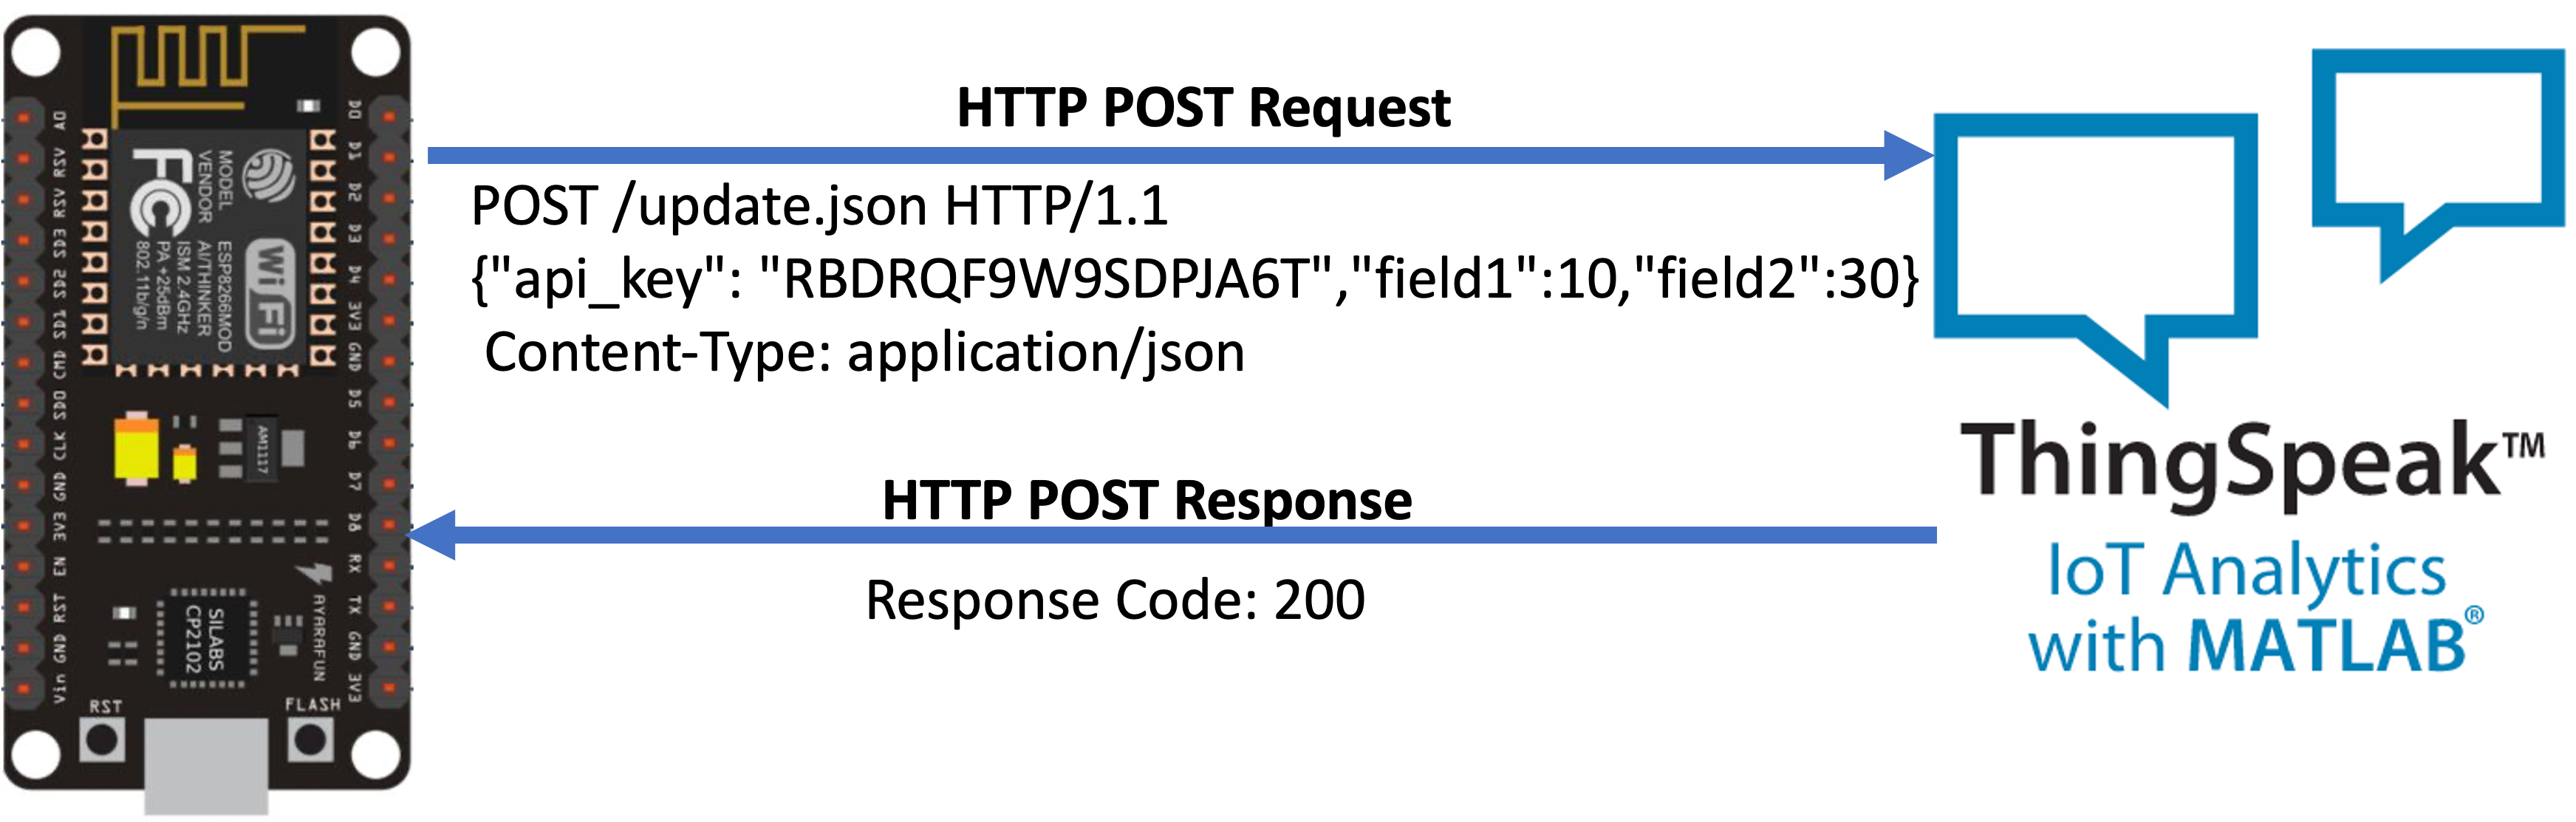
Trong phương thức POST, dữ liệu gửi đi nằm trong phần Body của request. Theo như tài liệu Thingspeak thì việc gửi dữ liệu bằng cách sử dụng phương thức POST có thể biểu diễn ở 2 cách sau. Trong phần Body của yêu cầu Request thì dữ liệu của chúng ta có thể biểu diễn ở dạng URL encoded hoặc ở dạng JSON.
| Yêu cầu | POST /update.json HTTP/1.1 |
| Địa chỉ | Host: api.thingspeak.com |
| Kiểu dữ liệu | Content-Type: application/json |
| Độ dài Body | Content-Length: 59 |
| Dòng trắng | |
| Body | {“api_key”: “RBDRQF9W9SDPJA6T”,”field1”:10,”field2”:30} |
Hình 1. Gửi application/json theo phương thức **POST**
hoặc
| Yêu cầu | POST /update HTTP/1.1 |
| Địa chỉ | Host: api.thingspeak.com |
| Kiểu dữ liệu | Content-Type: application/x-www-form-urlencoded |
| Độ dài Body | Content-Length: 43 |
| Dòng trắng | |
| Body | api_key=RBDRQF9W9SDPJA6&field1=10&field2=30 |
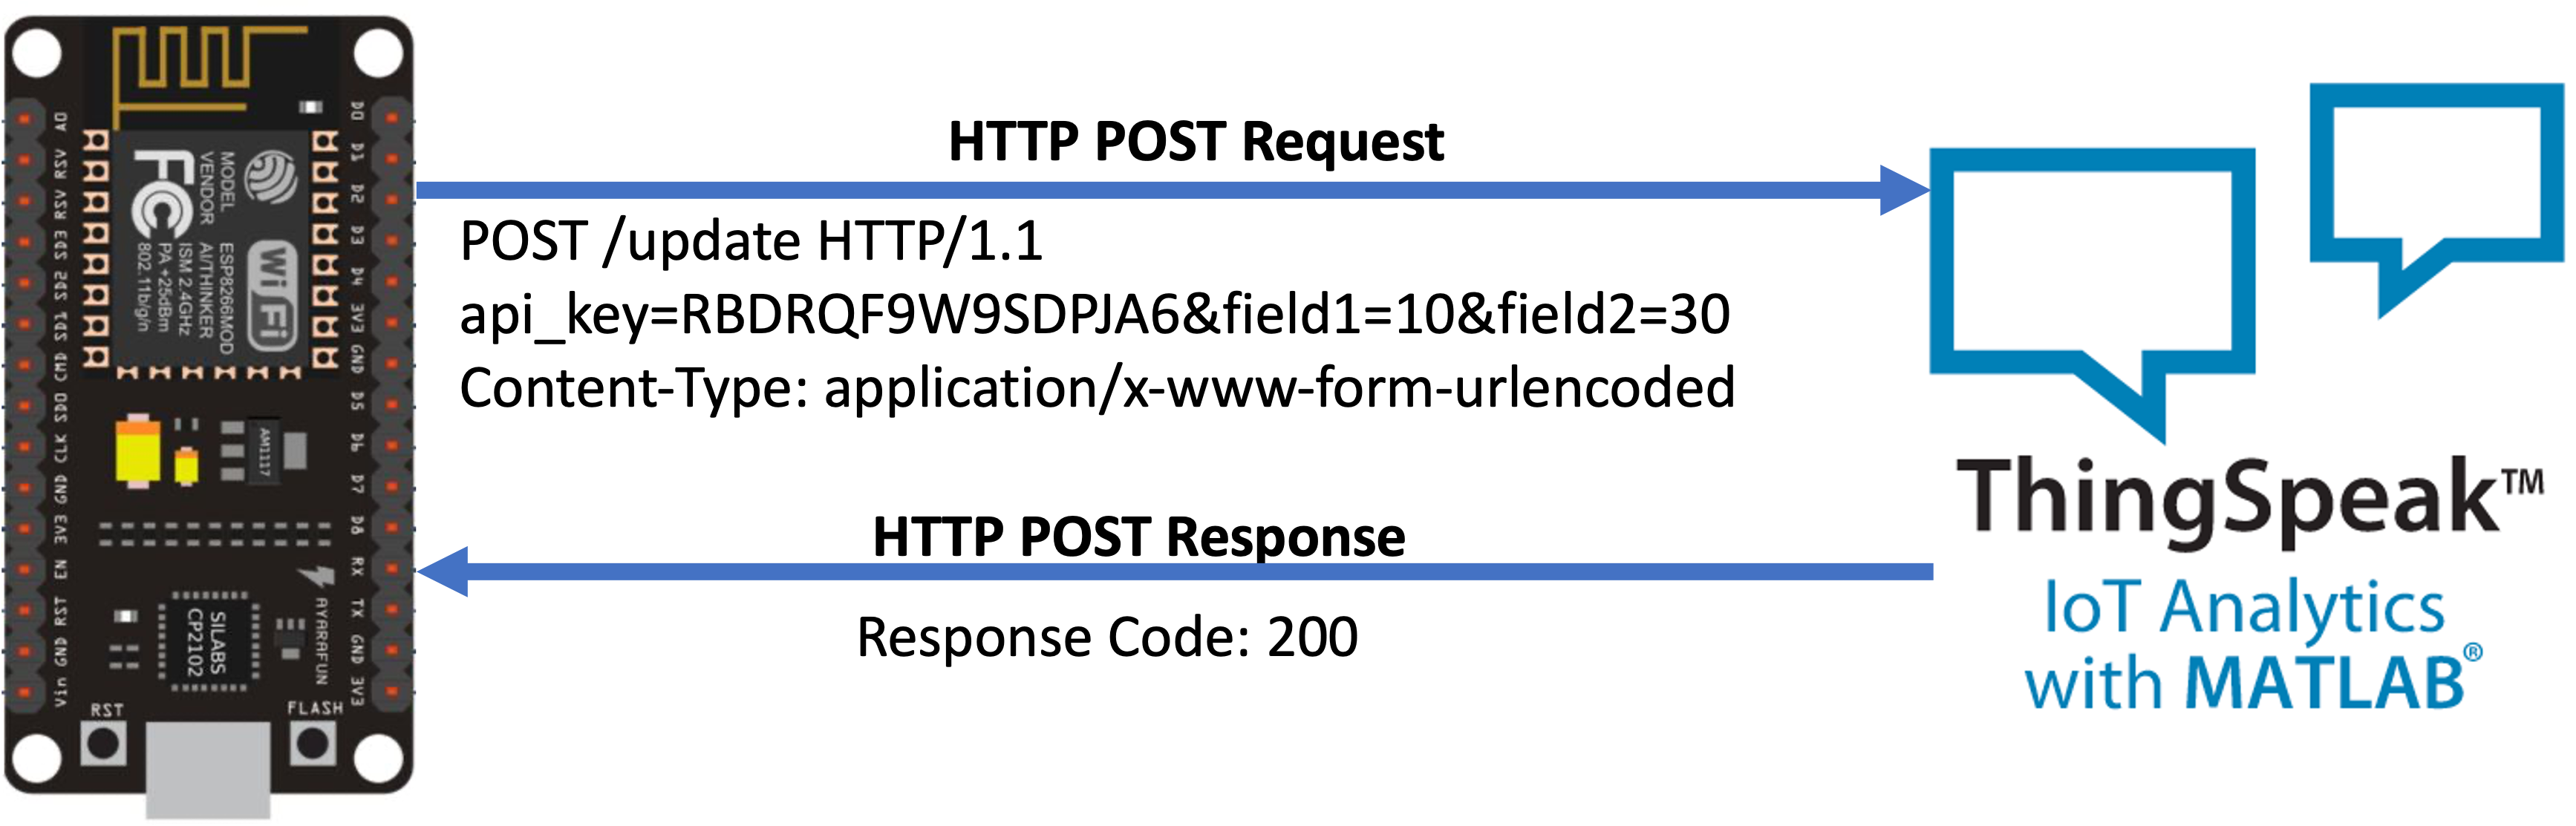
Hình 2. Gửi application/x-www-form-urlencoded theo phương thức **POST**
3. Kết nối và lập trình
3.1. Kết nối
Trong bài này, chúng ta tiếp tục làm việc với NodeMCU và DHT22. Cảm biến có thể được kết nối tới mô-đun NodeMCU theo sơ đồ Hình 3.
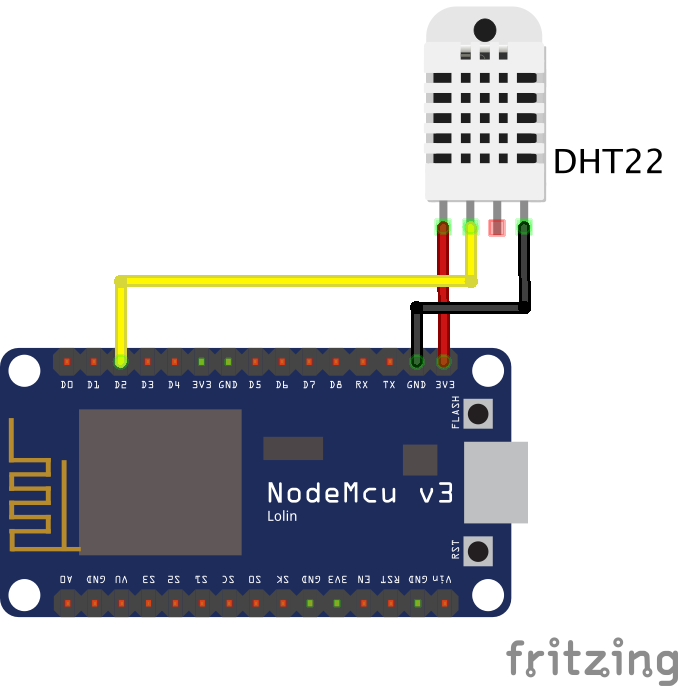
Hình 3. Sơ đồ kết nối NodeMCU với DHT22
3.2. Sử dụng HTTP POST request
Có 2 cách lập trình trên Arduino IDE cho NodeMCU có thể gửi HTTP POST request tới máy chủ (Server) từ xa:
- Cách 1: chúng ta chỉ sử dụng 1 thư viện ESP8266WiFi.h.
- Cách 2: chúng ta có thể sử dụng kết hợp 2 thư viện ESP8266WiFi.h và ESP8266HTTPClient.h.
Các bạn có thể tham khảo code mẫu tại đây.
a. Sử dụng ESP8266WiFi.h: các bạn có thể tham khảo Sketch sau đây.
#include <ESP8266WiFi.h>
#include "DHT.h"

// You need to edit with your network credentials.
#define WIFI_NAME "YOUR_WIFI_NAME"
#define WIFI_PASSWORD "YOUR_WIFI_PASSWORD"

// Initialize the client library
WiFiClient client;

// You need to edit with your ThingSpeak information.
#define THING_SPEAK_ADDRESS "api.thingspeak.com"
String writeAPIKey="YOUR_WRITE_API_KEY";

// DHT information
#define DHTPIN D2
#define DHTTYPE DHT22
DHT dht(DHTPIN, DHTTYPE);

unsigned long lastTime = 0;
unsigned long delayTime = 20000; // set a period of sending data.

void setup()
{
  Serial.begin(115200);
  Serial.println();

  WiFi.begin(WIFI_NAME, WIFI_PASSWORD);

  Serial.print("Connecting to WiFi");
  while (WiFi.status() != WL_CONNECTED)
  {
    delay(500);
    Serial.print(".");
  }
  Serial.println();

  Serial.print("Connected, IP address: ");
  Serial.println(WiFi.localIP());

  // Begin DHT Sensor
  dht.begin();

  delay(2000);
}

void loop() {
  if ((millis() - lastTime) > delayTime) {
    HTTPPost();
    lastTime = millis();
  }
}

void HTTPPost() {
  if (client.connect(THING_SPEAK_ADDRESS, 80)) {
    Serial.println("Server connected");

    // Read DHT sensor
    float h = dht.readHumidity();    // Read humidity as %
    float t = dht.readTemperature(); // Read temperature as Celsius (the default)
    // Check if any reads failed and exit early (to try again).
    if (isnan(h) || isnan(t)) {
      Serial.println(F("Failed to read from DHT sensor!"));
      return;
    }

    Serial.println("Sending POST request:");
    // String postData= "api_key=" + writeAPIKey + "&field1=" + String(t) + "&field2=" + String(h);
    String postData = "{\"api_key\":\"" + writeAPIKey + "\",\"field1\":\"" + String(t) + "\",\"field2\":\"" + String(h) + "\"}";
    // client.println("POST /update HTTP/1.1");
    client.println("POST /update.json HTTP/1.1");
    client.println( "Host: api.thingspeak.com" );
    client.println( "Connection: close" );
    // client.println( "Content-Type: application/x-www-form-urlencoded" );
    client.println( "Content-Type: application/json" );
    client.println( "Content-Length: " + String( postData.length() ) );
    client.println();
    client.println( postData );
    Serial.println( postData );

    unsigned long timeout = millis();
    while (client.available() == 0) {
      if (millis() - timeout > 5000){
        Serial.println(">>> Client Timeout !");
        client.stop(); return;
        }
    }

    // Read all the lines of the reply from server and print them to Serial
    while (client.available()){
      String line = client.readStringUntil('\r'); Serial.print(line);
    }

    Serial.println("\nClosing connection\n");
  }
}
Thay đổi thông tin kết nối WiFi dành cho mô-đun:
// You need to edit with your network credentials.
#define WIFI_NAME "YOUR_WIFI_NAME"
#define WIFI_PASSWORD "YOUR_WIFI_PASSWORD"
Tiếp theo, để cập nhật dữ liệu lên Thingspeak, chúng ta cũng cần tới Write API Key trên kênh của mình.
// You need to edit with your ThingSpeak information.
String writeAPIKey="YOUR_WRITE_API_KEY";
Câu lệnh HTTP POST request được thực thi tại đây để yêu cầu cập nhật 2 giá trị cho field1 và field2. Trong đoạn code này, chúng ta sử dụng kiểu dữ liệu JSON cho thông tin gửi đi. Ngoài ra, các bạn có thể xem các dòng code được Commnent nếu bạn muốn gửi dữ liệu urlencoded.
Serial.println("Sending POST request:");
// String postData= "api_key=" + writeAPIKey + "&field1=" + String(t) + "&field2=" + String(h);
String postData = "{\"api_key\":\"" + writeAPIKey + "\",\"field1\":\"" + String(t) + "\",\"field2\":\"" + String(h) + "\"}";
// client.println("POST /update HTTP/1.1");
client.println("POST /update.json HTTP/1.1");
client.println( "Host: api.thingspeak.com" );
client.println( "Connection: close" );
// client.println( "Content-Type: application/x-www-form-urlencoded" );
client.println( "Content-Type: application/json" );
client.println( "Content-Length: " + String( postData.length() ) );
client.println();
client.println( postData );
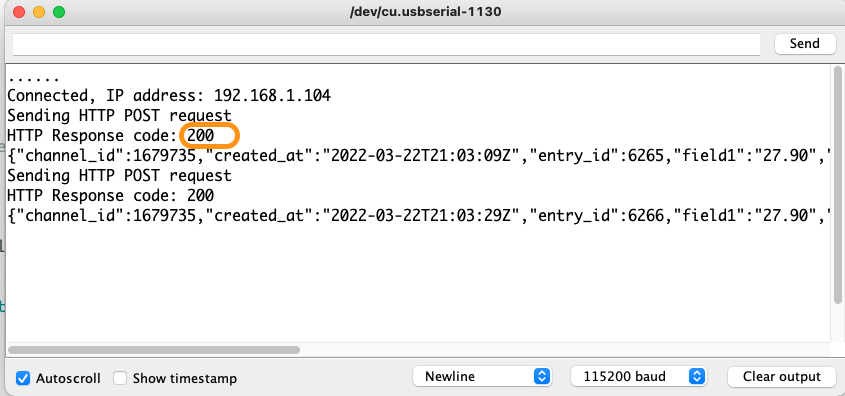
Serial.println( postData );Sau khi Upload chương trình lên mô-đun, chúng ta có thể theo dõi Response Code trả về qua Serial Monitor. Code trả về 200 OK có nghĩa là yêu cầu cập nhật dữ liệu thành công (Hình 4).

Hình 4. Code trả về qua Serial Montior
b. Sử dụng ESP8266WiFi.h và ESP8266HTTPClient.h. Chúng ta có thể sử dụng Sketch sau:
#include <ESP8266WiFi.h>
#include <ESP8266HTTPClient.h>
#include "DHT.h"

// You need to edit with your network credentials.
#define WIFI_NAME "YOUR_WIFI_NAME"
#define WIFI_PASSWORD "YOUR_WIFI_PASSWORD"

// You need to edit with your ThingSpeak information.
String writeAPIKey = "YOUR_WRITE_API_KEY";

// DHT information
#define DHTPIN D2
#define DHTTYPE DHT22
DHT dht(DHTPIN, DHTTYPE);

unsigned long lastTime = 0;
unsigned long delayTime = 20000; // set a period of sending data.

void setup()
{
  Serial.begin(115200);
  Serial.println();

  WiFi.begin(WIFI_NAME, WIFI_PASSWORD);

  Serial.print("Connecting to WiFi");
  while (WiFi.status() != WL_CONNECTED)
  {
    delay(500);
    Serial.print(".");
  }
  Serial.println();

  Serial.print("Connected, IP address: ");
  Serial.println(WiFi.localIP());

  // Begin DHT Sensor
  dht.begin();

  delay(2000);
}

void loop() {
    //Send an HTTP POST request every 20 seconds
    if ((millis() - lastTime) > delayTime) {
        httpPostRequest();
        lastTime = millis();
    }
}

void httpPostRequest() {
    WiFiClient client;
    HTTPClient http;

    // Read DHT sensor
    float h = dht.readHumidity();    // Read humidity as %
    float t = dht.readTemperature(); // Read temperature as Celsius (the default)
    // Check if any reads failed and exit early (to try again).
    if (isnan(h) || isnan(t)) {
        Serial.println(F("Failed to read from DHT sensor!"));
        return;
    }

    http.begin(client, "http://api.thingspeak.com/update.json");
    /*
    // Specify content-type header
    http.addHeader("Content-Type", "application/x-www-form-urlencoded");
    // Data to send with HTTP POST
    String httpRequestData = "api_key=" + writeAPIKey + "&field1=" + String(t) + "&field2=" + String(h);
    // Send HTTP POST request
    int httpResponseCode = http.POST(httpRequestData);
    */

    // If you need an HTTP request with a content type: application/json, use the following:
    http.addHeader("Content-Type", "application/json");
    // JSON data to send with HTTP POST
    String httpRequestData = "{\"api_key\":\"" + writeAPIKey + "\",\"field1\":\"" + String(t) + "\",\"field2\":\"" + String(h) + "\"}";
    // Send HTTP POST request
    Serial.println("Sending HTTP POST request");
    int httpResponseCode = http.POST(httpRequestData);

    String payload = "{}";

    if (httpResponseCode>0) {
        Serial.print("HTTP Response code: ");
        Serial.println(httpResponseCode);
        payload = http.getString();
        Serial.println(payload);
    }
    else {
        Serial.print("Error code: ");
        Serial.println(httpResponseCode);
    }
    // Free resources
    http.end();
}
Trong Sketch này, thư viện ESP8266HTTPClient.h cho phép chúng ta khởi tạo một đối tượng HTTPClient và các phương thức HTTP requests được hỗ trợ ở đây. Đối tượng http gọi phương thức POST() để gửi POST URL Request.
WiFiClient client;
HTTPClient http;
http.begin(client, "http://api.thingspeak.com/update.json");
/*
// Specify content-type header
http.addHeader("Content-Type", "application/x-www-form-urlencoded");
// Data to send with HTTP POST
String httpRequestData = "api_key=" + writeAPIKey + "&field1=" + String(t) + "&field2=" + String(h);
// Send HTTP POST request
int httpResponseCode = http.POST(httpRequestData);
*/

// If you need an HTTP request with a content type: application/json, use the following:
http.addHeader("Content-Type", "application/json");
// JSON data to send with HTTP POST
String httpRequestData = "{\"api_key\":\"" + writeAPIKey + "\",\"field1\":\"" + String(t) + "\",\"field2\":\"" + String(h) + "\"}";
// Send HTTP POST request
Serial.println("Sending HTTP POST request");
int httpResponseCode = http.POST(httpRequestData);
Sau khi gửi POST request, máy chủ gửi lại HTTP code response để xác nhận yêu cầu đã gửi thành công. Ngoài ra, Thingspeak cũng gửi lại thông tin của Channel dưới dạng JSON.
String payload = "{}";

if (httpResponseCode>0) {
    Serial.print("HTTP Response code: ");
    Serial.println(httpResponseCode);
    payload = http.getString();
    Serial.println(payload);
}
else {
    Serial.print("Error code: ");
    Serial.println(httpResponseCode);
}
Tương như trong trường hợp trên, sau khi Upload chương trình lên mô-đun, chúng ta có thể theo dõi Response Code trả về qua Serial Monitor. Code trả về 200 có nghĩa là yêu cầu cập nhật dữ liệu thành công (Hình 5).
Hình 5. Code trả về qua Serial Montior
4. Kết luận
Như vậy, chúng ta có thể sử dụng HTTP POST request để cập nhật dữ liệu trên Thingspeak. Trong 2 cách lập trình cho NodeMCU, chúng ta đều nhận được các kết quả như nhau, dữ liệu được cập nhật thành công trên Thingspeak và trả về code 200 (Hình 6).
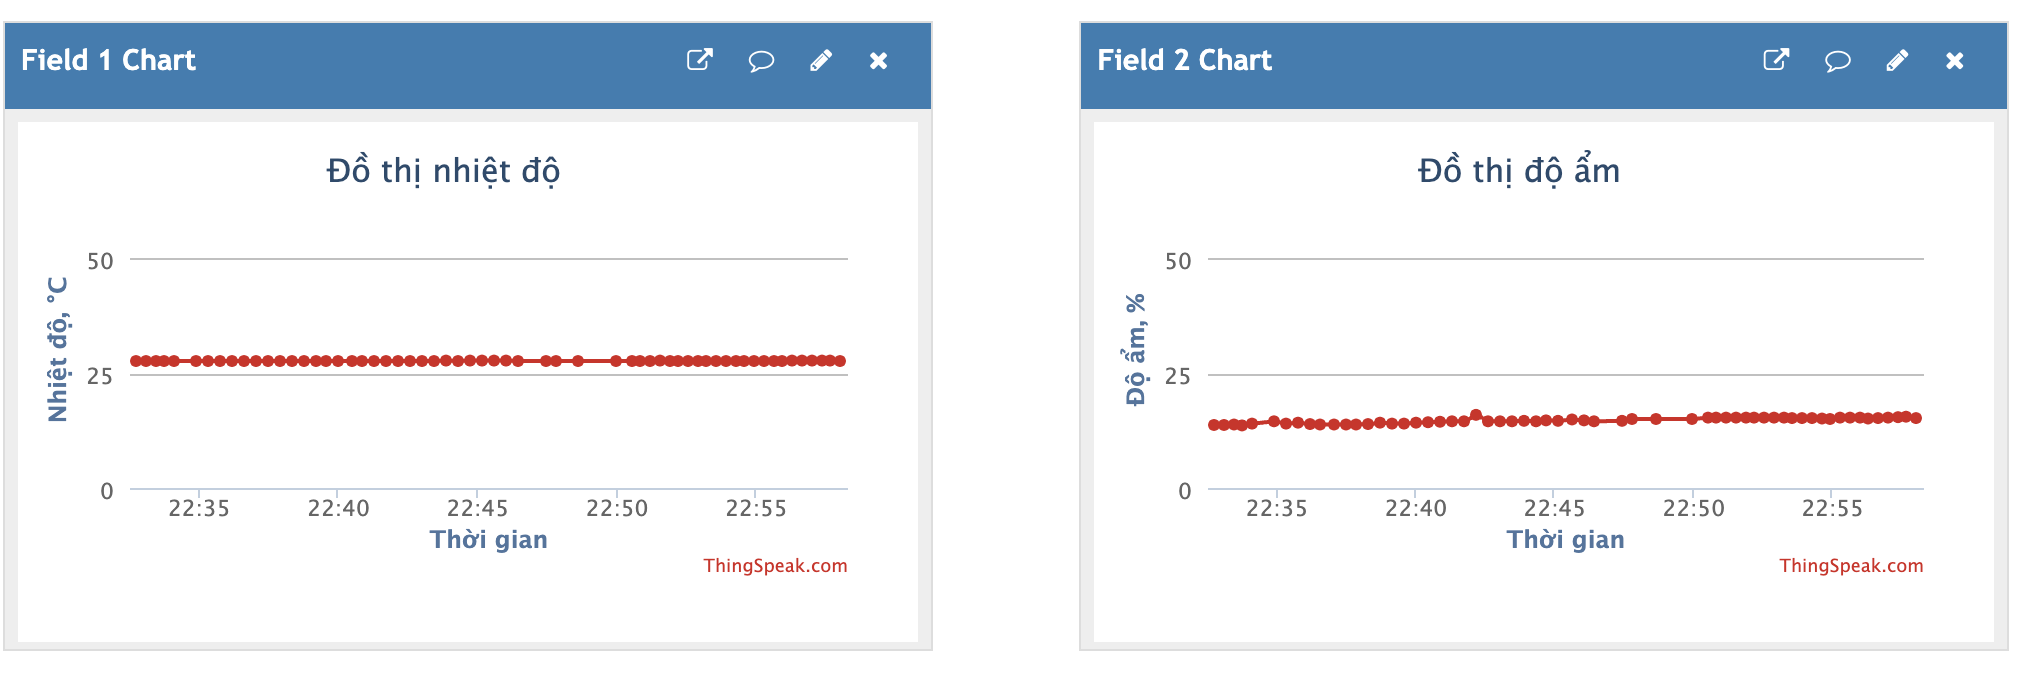
Hình 6. Đồ thị biểu diễn dữ liệu trên Thingspeak
Có thể thấy rằng, Thingspeak hỗ trợ nhiều phương thức khác nhau để gửi dữ liệu lên Channel. Mỗi phương thức sẽ phù hợp với từng loại thiết bị khác nhau.
Một lần nữa việc các phương thức GET, POST xây dựng trên giao thức HTTP có thể sẽ chiếm lượng tài nguyên lớn trên đường truyền nếu số lượng thiết bị IoT ngày một tăng. Do đó mà hiện nay một số giao thức khác như MQTT, CoAP được phát triển dành cho mạng Internet of Things.